Administrator workflows
Multifactor Authentication (MFA) User Guide
Scope: This guide applies to non-federated (non-SSO) user accounts. MFA is required at every login and cannot be turned off. Federated (Single Sign-On) users are not affected and should continue to log in through their organization's identity provider.
1. Overview
All non-federated user accounts are required to set up Multifactor Authentication (MFA) using an authenticator app on their mobile device. Once MFA is enabled on an account, you will be asked for a 6-digit code every time you log in, in addition to your username and password.
Supported app: Google Authenticator.
New users: you will complete MFA setup as part of your first login, before you can access the application.
Existing users: you will be prompted to complete MFA setup before you can regain access.
MFA cannot be disabled by any user or administrator role.
Application content and patient/exam information are never shown until MFA is successfully completed.
2. MFA Setup (Device Registration)
The first time you log in, you'll be asked to register an authenticator device. This only needs to be done once per device.
1. Download an authenticator app
Before you begin, install Google Authenticator on your mobile phone from the App Store (iOS) or Google Play (Android).
2. Launch the platform, enter your username and password
On the "Authenticator App" screen, enter your account password in the field provided.
3. Scan the QR code
Open the authenticator app on your phone, choose the option to add a new account (usually a "+" icon), and select "Scan a QR code." Point your phone's camera at the QR code shown on your screen.
4. Enter the 6-digit code
After scanning, the authenticator app will immediately display a 6-digit code for this account. Type that code into the "6-digit code" field.
5. Click Verify
Click Verify to complete registration. Once verified, you'll be signed in and taken into the application.
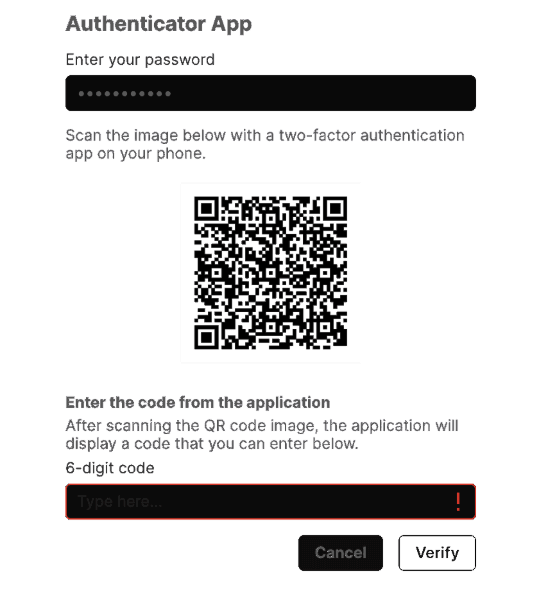
Registration screen shown on first login (Authenticator App)
Tip: If Verify stays greyed out or you get an error, double check the 6-digit code hasn't expired — Google Authenticator refreshes codes every 30 seconds. If it expired, wait for the app to generate a new code and re-enter it.
3. Logging In After Registration
Once your device is registered, you'll be asked for a new 6-digit code every time you log in — including after a manual logout or a session timeout. You will not be re-prompted for MFA while you remain actively logged in within the normal session window.
1. Log in with your username and password as usual
Enter your credentials on the standard login screen.
2. Open your authenticator app
When the "Authentication Code" screen appears, open the authenticator app on your mobile device to view your current 6-digit code.
3. Enter the 6-digit code
Type the code into the "6-Digit-Code" field.
4. Click Verify
Click Verify to complete login. If you entered your credentials incorrectly or want to start over, click Back.
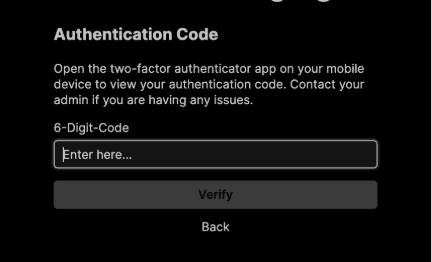
Authentication screen shown on every login (Authentication Code)
4. Resetting MFA Registration
If you lose your phone, get a new device, or your authenticator app is no longer generating valid codes, you will need to have your MFA registration reset. When your MFA settings have been cleared and you next try to log in, you will be prompted to set up (register) your authenticator device.
1. Request a reset
Call the toll-free number for your region listed at https://enterpriseimaging-support.optum.com.
2. Register your new device
Once your MFA registration is cleared, log in to the application and follow the prompts to register your device as described in Section 2.